Installing a slat wall often looks easier than it really is. The basic principle is straightforward, but small inaccuracies in measuring, spacing, or fixing quickly become visible when the finished wall is made up of repeated slats placed side by side.
That is why it helps to think like an installer before you fix the first slat. In this guide, we walk through how to install a slat wall step by step, what to prepare, which mistakes are most common, and how to get a straight, balanced result indoors or in dry sheltered outdoor areas.
What should you clarify before installing a slat wall?
Before you reach for the drill and saw, it helps to define what kind of wall you are actually building. A decorative slat wall behind a TV places different demands on the project than a room divider, headboard, or screened patio solution. The substrate matters too. Installing into drywall, timber studs, concrete, or masonry is not the same job.
You should also decide whether the slats will be fixed directly to the wall, mounted on battens, or built as part of a separate frame. Direct fixing can work well on some interior surfaces, but a battened setup often gives better control over ventilation, alignment, and fixings. That is especially useful if the substrate is uneven or you want to bring the wall slightly forward.
What equipment do you need?
You do not need specialist tools to install a slat wall, but you do need equipment that makes accurate work possible. In most cases, the key is setting a straight reference and keeping the spacing consistent from start to finish.
- tape measure, pencil, and a spirit level or laser
- saw for cutting slats and any battens
- drill and screws suited to the substrate
- a spacer block or template to keep the openings consistent
- mounting adhesive or concealed fixings if the chosen system needs it
If you are still deciding on materials, it can help to read more about which wood species work best for slat walls before you settle on the final build.
How do you prepare the wall before installation?
Good preparation is often what separates a polished result from a project that feels heavier than it needs to. Start by measuring the full surface in several places. Walls and ceilings are rarely perfectly straight, and if you only measure one point you can end up with cuts or gaps that stop making sense near the end.
Then mark a clear starting line. The first slat or first batten needs to be straight. If it is not, the rest of the wall will gradually drift out of plumb. It is also worth checking whether skirting boards, outlets, switches, or ceiling trim affect the layout. Small details like these are a common reason a good plan has to be adjusted halfway through installation.
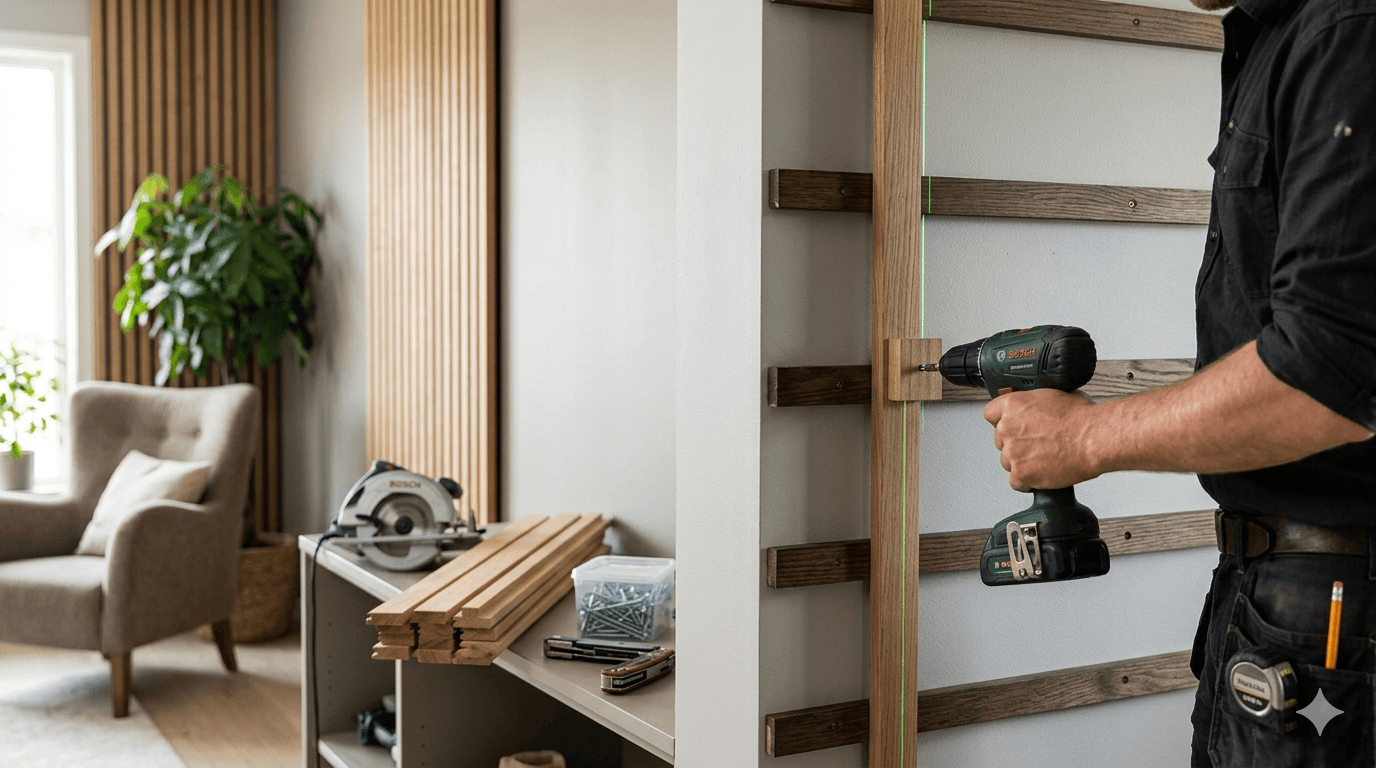
How to install a slat wall step by step
Once the measurements are checked and the materials are ready, the job becomes much easier if you follow a fixed sequence. That reduces the risk of crooked lines and unnecessary corrections.
- Create a straight reference. Mark where the wall should begin and use a level or laser to make sure the first line is exact.
- Install battens or a backing frame if needed. This gives you better control over the fixings and makes it easier to correct uneven substrates.
- Cut the slats accurately. Even small differences in length become visible at the top or bottom of the wall.
- Take extra care with the first slat. In practice, the whole expression of the wall follows this line.
- Use a fixed spacer between each slat. That is the safest way to keep the rhythm even.
- Check the wall as you go. Pause regularly and verify plumb, alignment, and gap size before continuing.
- Finish with any fine adjustment and surface treatment. This matters most if the wall is exposed or meant to have a specific finish.
If you are building from scratch rather than only installing pre-cut materials, our guide to building a slat wall yourself step by step can also be useful.
Should the slats be screwed, glued, or fixed invisibly?
There is no single fixing method that suits every project. Screws give secure, visible fixing, especially where the wall needs to handle load or where the substrate calls for a mechanical connection. Adhesive can create a cleaner look on lighter interior installations, but it only works when the substrate is stable and well suited to it.
Many people want concealed fixings because the result feels calmer. That can work very well, but it also places higher demands on planning and precision. If you are unsure, it is usually better to choose a simple, robust solution than a more elegant method that becomes weak or difficult to adjust.
Which mistakes are most common when installing a slat wall?
The most common mistake is trusting the eye when the project really needs measured accuracy. Many people assume small deviations do not matter much, but a slat wall repeats the same dimensions many times. That makes even minor errors stand out. Another typical mistake is forgetting that the substrate can be uneven, so measuring only one end of the wall is not enough.
It is also common to choose the spacing from an attractive reference photo without testing how it works with the actual wall width. Then the layout may look good in theory but fail to resolve neatly in practice. That is why it pays to calculate the combination before you buy the full material package.
When should you get help with the installation?
Smaller interior projects are often completely manageable to install yourself. But if the wall is large, freestanding, runs across several surfaces, or demands a very precise finish in a prominent room, it can be smart to get help. The same applies if you are installing in a bathroom, on a demanding substrate, or in a build that needs to handle weather exposure over time.
The main point is not whether you do the work yourself. It is whether the solution ends up straight, secure, and durable. Many projects become both faster and cheaper overall when a little more time goes into planning instead of correcting mistakes later.
Summary
Installing a slat wall is mainly about sequence, accurate measuring, and even fixings. Once the first line is correct, the spacing is thought through, and the substrate is properly prepared, the rest of the project becomes much easier to carry out.
Before you order materials, it helps to test a few combinations of slat width and spacing. That shows you more quickly what both looks right and works with your measurements. Use the calculator to estimate the slat count and total linear footage before you begin.